Posted on

Making and Heat Treating a Benjamin/Sheridan Valve Tool

Much of my email relates to the vintage Benjamin/Sheridan videos that have been posted at our youtube channel here;

https://www.youtube.com/channel/UCKkdp1jlZDmBxHvPD41itNw

And many of those emails relate to the valve tool that is necessary to remove the valve retaining nut and the valve itself. Quite a few people have asked about the dimensions of the valve tool, with the idea that they would make their own tool.

So that’s what this two part video is about. First, we take a look at the dimensions of the tool. Included at the end of this blog are my (childlike) drawings, which should be enough for a person to work from. Then we make the tool, taking it through the Logan lathe and Sherline mill to complete all machining operations.

Finally, we heat treat the tool, to both harden it so it won’t deform in use, and to make it tough so the brittleness caused by hardening doesn’t result in the tool breaking. We used our little heat treating kiln for the hardening process, first hardening by quenching after the part reached its critical temperature (1475 degrees F), and then tempering at a lower heat (475 degrees F) and cooling slowly.

Some might ask why not just temper at 475 degrees and be done with it? Well, you can’t get there from here! To get the proper combination of hard and tough, you first have to fully harden the tool. Then you can ‘soften’ it a bit to make it tough by tempering at the lower temperature.

I hope you enjoy the videos and appreciate the work that can go into making the valve tool. It puts into perspective the price to buy one. At $15+/- it seems pretty reasonable.

Feel free to leave comments here at the blog, or contact me at nwa@northwestairguns.com, or use the ‘contact us’ function her on the blog site. Here’s Part A;

And if you need help finding it, Part B;

Enjoy!!!
Benjamin Sheridan Valve Tool P2

Benjamin Sheridan Valve Tool p1

Posted on

Benjamin 312 Air Rifle Strip, Teardown & Dis-Assembly

If it seems like I’m putting up a lot of video about this particular airgun, well, I am.   I can’t help it, I love the old tootsie-roll forearm Benjamin pumpers.  And the later versions too.  It may be a childhood thing, bringing back memories of riding my bicycle with my air rifle across the handlebars, searching for pop bottles along the roads (yes, people used to just throw the empties out the car window!!), then redeeming them at a little country store to buy more pellets.  Roaming the hills around the (then) undeveloped east side of the Napa Valley, shooting at whatever seemed a suitable target.  Lightweight, easy to cock, reasonably accurate, I associate these Benjamins with  independence and freedom, especially during my summers off from school.

Fast forward to 2014; as an airgun accumulator (always got my eye open for one, but am not a collector), I hate to see these classic air rifles fatally damaged during a ham-fisted repair.  Even worse is a trip to the dump after grandpa or Uncle Bob dies and the heirs are clearing (throwing) out his stuff.  Grandchild to heir; ‘This old thing doesn’t even work’.  Heir;  ‘Awwww, just throw it out with the rest of his junk’.

So, maybe these videos will be of interest to someone who has come to posses a ‘soldered valve’ Benjamin that doesn’t hold air anymore or shoots weakly, and who wants to get it back in trim.  Maybe others, after seeing the detail involved, will decide that it is better to send the old Benji off to a professional airgunsmith for repair.   Either option is preferred to the scrap heap.

We have other video’s showing a ‘cut out’ of a Benjamin 312, and how the internals work.  But this video deals with the tear-down of a repairable Benjamin 312.  The same basic process also applies to the 310 and 317, and the later 340/342/347 series (although the safety is different).  Even a few early 392/397’s had a soldered valve, and are similar in dis-assembly.  Here’s the video;

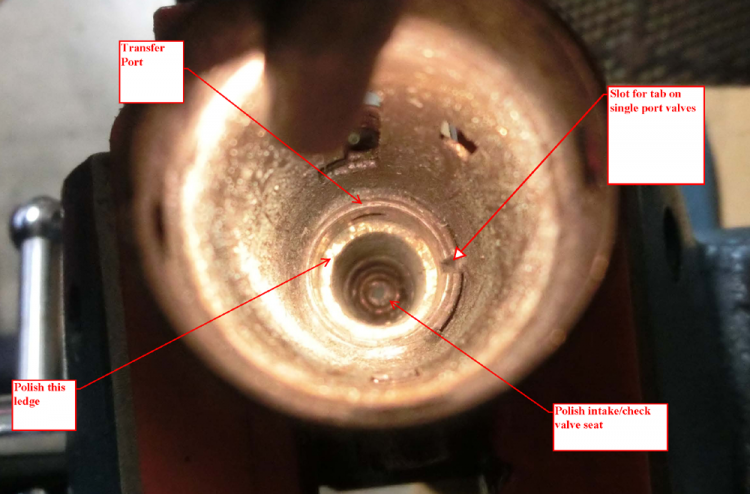
I haven’t shown re-assembly, but it’s pretty much the reverse of dis-assembly.  Just make sure the inside of the tube is clean, and that the seating surfaces for the check valve and exhaust valve are polished smooth and flat.  The main tube and barrel are brass, and won’t rust;  you can clean it up in the bathtub if the rest of the household doesn’t mind, and it won’t hurt anything.   One last thing, I usually put the pump assembly in before the valve components;  it’s just easier for me to adjust the pump rod length that way, without any possible back pressure from the valve.

If you decide to rebuild your Benjamin, you will need to have ‘THE TOOL’, which is available from Bryan & Associates and other suppliers, to remove and re-install the valve retaining nut and valve body.  You will also need a rebuild kit with new seals and pump cup and other odds and ends.   I tend to use the Mac1 Airgun Shop kits, which I find to be of top quality, but Bryan & Associates, AB Airguns, Precision Pellet, Pyramid Air and maybe some others also offer kits that should enable a rebuilder to get ‘er done.

So, with that, I hope this video is informative and helpful.  Feel free to comment if you can  suggest better ways to do things or have questions about the process.


Posted on

Sheridan Bolt Lug Tool (how to make and how to use it)

This was really a kind of test video to see if we could make one, edit it to reasonable length, and upload it to our YouTube channel. And it worked!!! You can make this tool, but Mac1airgunstore.com also offers them for sale if you’d prefer. And this is the first attempt at embedding video here on the webpage. Hope you enjoy the video and find it useful;


Posted on

Benjamin pump-up air rifle; How it works demonstration

I had an old ‘beater’ Benjamin 312, actually several, and so decided to sacrifice one to demonstrate the inner workings of this classic pneumatic air rifle. There are two videos, only to keep each within a 15 minute time frame. Most vintage and even modern pneumatic airguns operate in a similar manner, although the innards and specific mechanisms may differ substantially. I hope these videos are entertaining and informative.