If it seems like I’m putting up a lot of video about this particular airgun, well, I am. I can’t help it, I love the old tootsie-roll forearm Benjamin pumpers. And the later versions too. It may be a childhood thing, bringing back memories of riding my bicycle with my air rifle across the handlebars, searching for pop bottles along the roads (yes, people used to just throw the empties out the car window!!), then redeeming them at a little country store to buy more pellets. Roaming the hills around the (then) undeveloped east side of the Napa Valley, shooting at whatever seemed a suitable target. Lightweight, easy to cock, reasonably accurate, I associate these Benjamins with independence and freedom, especially during my summers off from school.
Fast forward to 2014; as an airgun accumulator (always got my eye open for one, but am not a collector), I hate to see these classic air rifles fatally damaged during a ham-fisted repair. Even worse is a trip to the dump after grandpa or Uncle Bob dies and the heirs are clearing (throwing) out his stuff. Grandchild to heir; ‘This old thing doesn’t even work’. Heir; ‘Awwww, just throw it out with the rest of his junk’.
So, maybe these videos will be of interest to someone who has come to posses a ‘soldered valve’ Benjamin that doesn’t hold air anymore or shoots weakly, and who wants to get it back in trim. Maybe others, after seeing the detail involved, will decide that it is better to send the old Benji off to a professional airgunsmith for repair. Either option is preferred to the scrap heap.
We have other video’s showing a ‘cut out’ of a Benjamin 312, and how the internals work. But this video deals with the tear-down of a repairable Benjamin 312. The same basic process also applies to the 310 and 317, and the later 340/342/347 series (although the safety is different). Even a few early 392/397’s had a soldered valve, and are similar in dis-assembly. Here’s the video;
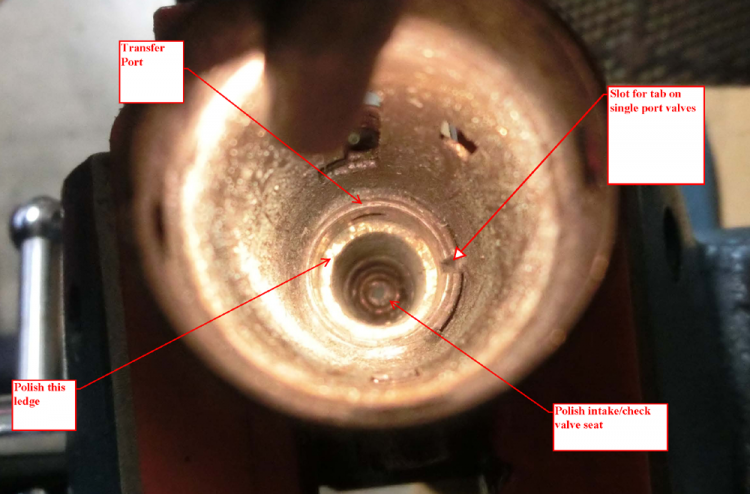
I haven’t shown re-assembly, but it’s pretty much the reverse of dis-assembly. Just make sure the inside of the tube is clean, and that the seating surfaces for the check valve and exhaust valve are polished smooth and flat. The main tube and barrel are brass, and won’t rust; you can clean it up in the bathtub if the rest of the household doesn’t mind, and it won’t hurt anything. One last thing, I usually put the pump assembly in before the valve components; it’s just easier for me to adjust the pump rod length that way, without any possible back pressure from the valve.
If you decide to rebuild your Benjamin, you will need to have ‘THE TOOL’, which is available from Bryan & Associates and other suppliers, to remove and re-install the valve retaining nut and valve body. You will also need a rebuild kit with new seals and pump cup and other odds and ends. I tend to use the Mac1 Airgun Shop kits, which I find to be of top quality, but Bryan & Associates, AB Airguns, Precision Pellet, Pyramid Air and maybe some others also offer kits that should enable a rebuilder to get ‘er done.
So, with that, I hope this video is informative and helpful. Feel free to comment if you can suggest better ways to do things or have questions about the process.

Leave a Reply
You must be logged in to post a comment.